Payment gateway helps to collect payment online on the web application. If you want to allows the users to make payment through your website, online payment gateway needs to be integrated. PayPal is a widely used payment gateway that allows you to accept payment online in the web application. PayPal provides various options to integrate payment gateway, like PayPal Standard, PayPal Pro, PayPal Checkout, etc.
PayPal Checkout is the easiest way to integrate payment gateway in your web application. PayPal Express Checkout payment gateway is very useful when you want to provide a user-friendly UI to the user for the online payment. The PayPal Express Checkout executes payments directly from the browser and the user does not need to leave your website for payment
There are two ways to integrate PayPal Checkout payment gateway, client-side and server-side integration. In server integration, PayPal API is called to create, execute and validate payment. Also, it helps you to integrate PayPal payment gateway with express checkout experience. In this tutorial, we will show you how to integrate PayPal express checkout with PayPal API using PHP.
The example code demonstrates PayPal express checkout integration in PHP. Also, the transaction information will be stored in the MySQL database. The following steps will be implemented to integrate PayPal express checkout payment gateway in PHP.
- Fetch products from the database and list with the Buy button.
- PayPal checkout button to make payment.
- Popup window to process payment via PayPal express checkout.
- Validate payment through PayPal API.
- Insert transaction data in the database.
- Display message to user based on the payment status.
Before getting started, look at the files structure of PayPal express checkout integration.

Create PayPal Sandbox Account
Before enabling payment gateway on your live site, it needs to be tested. PayPal Sandbox environment allows developers to test the transaction before making the payment gateway live. Follow the below steps to create PayPal sandbox account for PayPal express checkout.
- Go to the PayPal Developer Portal and Log into Dashboard. Log in using your PayPal account credentials. If you don’t have any PayPal account, sign up for a PayPal account first.
- In developer dashboard, click on the Accounts link under the Sandbox label from the left menu panel.
- Click the Create Account to create buyer and merchant account. Under the Account type section, select Personal for buyer account or Business for merchant account.


Create REST API App
- In the My Apps & Credentials page, scroll down to REST API apps section. Click the Create App to create an application to get REST API credentials.
- Enter your app name and select account that related to your business.
- Client ID and Secret will be generated. Copy these API credentials for later use in the script.


Create Database Tables
To store products and transactions information two tables need to be created in the database. The following SQL creates
products and payments tables in the MySQL database.CREATE TABLE `products` ( `id` int(11) NOT NULL AUTO_INCREMENT, `name` varchar(255) COLLATE utf8_unicode_ci NOT NULL, `image` varchar(255) COLLATE utf8_unicode_ci NOT NULL, `price` float(10,2) NOT NULL, `status` tinyint(1) NOT NULL DEFAULT '1' COMMENT '1=Active, 0=Inactive', PRIMARY KEY (`id`) ) ENGINE=InnoDB DEFAULT CHARSET=utf8 COLLATE=utf8_unicode_ci;
CREATE TABLE `payments` (
 `id` int(11) NOT NULL AUTO_INCREMENT,
 `product_id` int(10) NOT NULL,
 `txn_id` varchar(255) COLLATE utf8_unicode_ci NOT NULL,
 `payment_gross` float(10,2) NOT NULL,
 `currency_code` varchar(5) COLLATE utf8_unicode_ci NOT NULL,
 `payer_id` varchar(20) COLLATE utf8_unicode_ci NOT NULL,
 `payer_name` varchar(50) COLLATE utf8_unicode_ci NOT NULL,
 `payer_email` varchar(100) COLLATE utf8_unicode_ci NOT NULL,
 `payer_country` varchar(5) COLLATE utf8_unicode_ci NOT NULL,
 `payment_status` varchar(10) COLLATE utf8_unicode_ci NOT NULL,
 `created` datetime NOT NULL,
 PRIMARY KEY (`id`)
) ENGINE=InnoDB DEFAULT CHARSET=utf8 COLLATE=utf8_unicode_ci;
DB Class (DB.class.php)
The DB class handles all the database related operations (fetch, insert, and update). Specify the database host (
$dbHost), username ($dbUsername), password ($dbPassword), and name ($dbName) as per your MySQL database credentials.- __construct() – Connect the database.
- getRows() – Fetch records from the database based on the specified table and conditions.
- insert() – Insert data in the specified table.
- update() – Update data in the specified table based on the conditions.
<?php/*
 * DB Class
 * This class is used to handle the database related (connect, select, insert, and update) operations
 * @author    CodexWorld.com
 * @url        http://www.codexworld.com
 * @license    http://www.codexworld.com/license
 */class DB{
    private $dbHost     = "localhost";
    private $dbUsername = "root";
    private $dbPassword = "root";
    private $dbName     = "codexworld";

    public function __construct(){
        if(!isset($this->db)){
            // Connect to the database
            $conn = new mysqli($this->dbHost, $this->dbUsername, $this->dbPassword, $this->dbName);
            if($conn->connect_error){
                die("Failed to connect with MySQL: " . $conn->connect_error);
            }else{
                $this->db = $conn;
            }
        }
    }

    /*
     * Returns rows from the database based on the conditions
     * @param string name of the table
     * @param array select, where, order_by, limit and return_type conditions
     */
    public function getRows($table,$conditions = array()){
        $sql = 'SELECT ';
        $sql .= array_key_exists("select",$conditions)?$conditions['select']:'*';
        $sql .= ' FROM '.$table;

        if(array_key_exists("where",$conditions)){
            $sql .= ' WHERE ';
            $i = 0;
            foreach($conditions['where'] as $key => $value){
                $pre = ($i > 0)?' AND ':'';
                $sql .= $pre.$key." = '".$value."'";
                $i++;
            }
        }

        if(array_key_exists("order_by",$conditions)){
            $sql .= ' ORDER BY '.$conditions['order_by'];
        }

        if(array_key_exists("start",$conditions) && array_key_exists("limit",$conditions)){
            $sql .= ' LIMIT '.$conditions['start'].','.$conditions['limit'];
        }elseif(!array_key_exists("start",$conditions) && array_key_exists("limit",$conditions)){
            $sql .= ' LIMIT '.$conditions['limit'];
        }

        $result = $this->db->query($sql);

        if(array_key_exists("return_type",$conditions) && $conditions['return_type'] != 'all'){
            switch($conditions['return_type']){
                case 'count':
                    $data = $result->num_rows;
                    break;
                case 'single':
                    $data = $result->fetch_assoc();
                    break;
                default:
                    $data = '';
            }
        }else{
            if($result->num_rows > 0){
                while($row = $result->fetch_assoc()){
                    $data[] = $row;
                }
            }
        }
        return !empty($data)?$data:false;
    }

    /*
     * Insert data into the database
     * @param string name of the table
     * @param array the data for inserting into the table
     */
    public function insert($table,$data){
        if(!empty($data) && is_array($data)){
            $columns = '';
            $values  = '';
            $i = 0;

            if(!array_key_exists('created', $data)){
                $data['created'] = date("Y-m-d H:i:s");
            }

            foreach($data as $key=>$val){
                $pre = ($i > 0)?', ':'';
                $columns .= $pre.$key;
                $values  .= $pre."'".$val."'";
                $i++;
            }
            $query = "INSERT INTO ".$table." (".$columns.") VALUES (".$values.")";
            $insert = $this->db->query($query);
            return $insert?$this->db->insert_id:false;
        }else{
            return false;
        }
    }

    /*
     * Update data into the database
     * @param string name of the table
     * @param array the data for updating into the table
     * @param array where condition on updating data
     */
    public function update($table,$data,$conditions){
        if(!empty($data) && is_array($data)){
            $colvalSet = '';
            $whereSql = '';
            $i = 0;

            foreach($data as $key=>$val){
                $pre = ($i > 0)?', ':'';
                $colvalSet .= $pre.$key."='".$val."'";
                $i++;
            }
            if(!empty($conditions)&& is_array($conditions)){
                $whereSql .= ' WHERE ';
                $i = 0;
                foreach($conditions as $key => $value){
                    $pre = ($i > 0)?' AND ':'';
                    $whereSql .= $pre.$key." = '".$value."'";
                    $i++;
                }
            }
            $query = "UPDATE ".$table." SET ".$colvalSet.$whereSql;
            $update = $this->db->query($query);
            return $update?$this->db->affected_rows:false;
        }else{
            return false;
        }
    }
}
PaypalExpress Class (PaypalExpress.class.php)
The PaypalExpress class handles the PayPal API related operations. Specify the environment (
validate() –
$paypalEnv), API URL ($paypalURL), Client ID ($paypalClientID), and Secret ($paypalSecret) as per your PayPal REST API credentials.validate() –
- Get the access token using PayPal oauth2 API.
- Validate payment and get transaction data using PayPal Payments REST API.
<?php/*
 * PaypalExpress Class
 * This class is used to handle PayPal API related operations
 * @author    CodexWorld.com
 * @url        http://www.codexworld.com
 * @license    http://www.codexworld.com/license
 */class PaypalExpress{
    public $paypalEnv       = 'sandbox'; // Or 'production'
    public $paypalURL       = 'https://api.sandbox.paypal.com/v1/';
    public $paypalClientID  = 'Your_REST_API_Client_ID';
    private $paypalSecret   = 'Your_REST_API_Secret';

    public function validate($paymentID, $paymentToken, $payerID, $productID){
        $ch = curl_init();
        curl_setopt($ch, CURLOPT_URL, $this->paypalURL.'oauth2/token');
        curl_setopt($ch, CURLOPT_HEADER, false);
        curl_setopt($ch, CURLOPT_SSL_VERIFYPEER, false);
        curl_setopt($ch, CURLOPT_POST, true);
        curl_setopt($ch, CURLOPT_RETURNTRANSFER, true);
        curl_setopt($ch, CURLOPT_USERPWD, $this->paypalClientID.":".$this->paypalSecret);
        curl_setopt($ch, CURLOPT_POSTFIELDS, "grant_type=client_credentials");
        $response = curl_exec($ch);
        curl_close($ch);

        if(empty($response)){
            return false;
        }else{
            $jsonData = json_decode($response);
            $curl = curl_init($this->paypalURL.'payments/payment/'.$paymentID);
            curl_setopt($curl, CURLOPT_POST, false);
            curl_setopt($curl, CURLOPT_SSL_VERIFYPEER, false);
            curl_setopt($curl, CURLOPT_HEADER, false);
            curl_setopt($curl, CURLOPT_RETURNTRANSFER, true);
            curl_setopt($curl, CURLOPT_HTTPHEADER, array(
                'Authorization: Bearer ' . $jsonData->access_token,
                'Accept: application/json',
                'Content-Type: application/xml'
            ));
            $response = curl_exec($curl);
            curl_close($curl);

            // Transaction data
            $result = json_decode($response);

            return $result;
        }

    }
}
Products List (index.php)
In this page, all the products are listed with the Buy button.
- Fetch the products data from database using
getRows()function of DB class. - List the products with a Buy button. The Buy button redirects the user to the checkout page.
<?php// Include and initialize database classinclude 'DB.class.php';$db = new DB;
// Get all products$products = $db->getRows('products');?>

<?php// List all productsif(!empty($products)){
    foreach($products as $row){?>
<div class="item">
    <img src="images/<?php echo $row['image']; ?>"/>
    <p>Name: <?php echo $row['name']; ?></p>
    <p>Price: <?php echo $row['price']; ?></p>
    <a href="checkout.php?id=<?php echo $row['id']; ?>">BUY</a>
</div>
<?php
    }
}else{
    echo '<p>Product(s) not found...</p>';
}?>
Express Checkout (checkout.php)
In this page, selected product details are displayed with a checkout button.
- The respective product details fetched from the database using
getRows()function of DB class. - Product details are displayed with a checkout button.
<?php// Redirect to the home page if id parameter not found in URLif(empty($_GET['id'])){
    header("Location: index.php");
}
// Include and initialize database classinclude 'DB.class.php';$db = new DB;
// Include and initialize paypal classinclude 'PaypalExpress.class.php';$paypal = new PaypalExpress;
// Get product ID from URL$productID = $_GET['id'];
// Get product details$conditions = array(
    'where' => array('id' => $productID),
    'return_type' => 'single');$productData = $db->getRows('products', $conditions);
// Redirect to the home page if product not foundif(empty($productData)){
    header("Location: index.php");
}?>

<div class="item">
    <!-- Product details -->
    <img src="images/<?php echo $productData['image']; ?>"/>
    <p>Name: <?php echo $productData['name']; ?></p>
    <p>Price: <?php echo $productData['price']; ?></p>

    <!-- Checkout button -->
    <div id="paypal-button"></div>
</div>
PayPal Checkout Button:
The following code needed to add PayPal express checkout button.
The following code needed to add PayPal express checkout button.
Include the PayPal checkout JS library.
<script src="https://www.paypalobjects.com/api/checkout.js"></script>
Define an HTML element to render the checkout button.
<div id="paypal-button"></div>
Add JavaScript code to enable express checkout.
- Specify the environment and client ID which can be retrieved from the PaypalExpress class.
- Specify the total amount and currency which can be retrieved from product details.
- Specify the button selector as per your defined HTML element.
- On clicking the checkout button, a popup window will appear. The user will be able to make payment through PayPal.
- If payment is successful, the user will be redirected to the payment process page.
<!--
JavaScript code to render PayPal checkout button
and execute payment
-->
<script>
paypal.Button.render({
    // Configure environment
    env: '<?php echo $paypal->paypalEnv; ?>',
    client: {
        sandbox: '<?php echo $paypal->paypalClientID; ?>',
        production: '<?php echo $paypal->paypalClientID; ?>'
    },
    // Customize button (optional)
    locale: 'en_US',
    style: {
        size: 'small',
        color: 'gold',
        shape: 'pill',
    },
    // Set up a payment
    payment: function (data, actions) {
        return actions.payment.create({
            transactions: [{
                amount: {
                    total: '<?php echo $productData['price']; ?>',
                    currency: 'USD'
                }
            }]
      });
    },
    // Execute the payment
    onAuthorize: function (data, actions) {
        return actions.payment.execute()
        .then(function () {
            // Show a confirmation message to the buyer
            //window.alert('Thank you for your purchase!');

            // Redirect to the payment process page
            window.location = "process.php?paymentID="+data.paymentID+"&token="+data.paymentToken+"&payerID="+data.payerID+"&pid=<?php echo $productData['id']; ?>";
        });
    }
}, '#paypal-button');
</script>
Payment Process (process.php)
In this page, the transaction is validated via PayPal API and payment information is stored in the database.
- Get the payment ID, token, payer ID, and product ID from the URL.
- Validate the transaction using
validate()function of PaypalExpress class. - If payment is valid and approved, the following will happen.
- The transaction data will be inserted in the payments table.
- The user will be redirected to the payment status page with the DB insert ID.
<?php
$redirectStr = '';
if(!empty($_GET['paymentID']) && !empty($_GET['token']) && !empty($_GET['payerID']) && !empty($_GET['pid']) ){
    // Include and initialize database class
    include 'DB.class.php';
    $db = new DB;

    // Include and initialize paypal class
    include 'PaypalExpress.class.php';
    $paypal = new PaypalExpress;

    // Get payment info from URL
    $paymentID = $_GET['paymentID'];
    $token = $_GET['token'];
    $payerID = $_GET['payerID'];
    $productID = $_GET['pid'];

    // Validate transaction via PayPal API
    $paymentCheck = $paypal->validate($paymentID, $token, $payerID, $productID);

    // If the payment is valid and approved
    if($paymentCheck && $paymentCheck->state == 'approved'){

        // Get the transaction data
        $id = $paymentCheck->id;
        $state = $paymentCheck->state;
        $payerFirstName = $paymentCheck->payer->payer_info->first_name;
        $payerLastName = $paymentCheck->payer->payer_info->last_name;
        $payerName = $payerFirstName.' '.$payerLastName;
        $payerEmail = $paymentCheck->payer->payer_info->email;
        $payerID = $paymentCheck->payer->payer_info->payer_id;
        $payerCountryCode = $paymentCheck->payer->payer_info->country_code;
        $paidAmount = $paymentCheck->transactions[0]->amount->details->subtotal;
        $currency = $paymentCheck->transactions[0]->amount->currency;

        // Get product details
        $conditions = array(
            'where' => array('id' => $productID),
            'return_type' => 'single'
        );
        $productData = $db->getRows('products', $conditions);

        // If payment price is valid
        if($productData['price'] >= $paidAmount){

            // Insert transaction data in the database
            $data = array(
                'product_id' => $productID,
                'txn_id' => $id,
                'payment_gross' => $paidAmount,
                'currency_code' => $currency,
                'payer_id' => $payerID,
                'payer_name' => $payerName,
                'payer_email' => $payerEmail,
                'payer_country' => $payerCountryCode,
                'payment_status' => $state
            );
            $insert = $db->insert('payments', $data);

            // Add insert id to the URL
            $redirectStr = '?id='.$insert;
        }
    }

    // Redirect to payment status page
    header("Location:payment-status.php".$redirectStr);
}else{
    // Redirect to the home page
    header("Location:index.php");
}?>
PayPal Status (payment-status.php)
In this page, the payment data is retrieved from the database based on the ID specified in the URL and the payment status is shown to the user.
<?phpif(!empty($_GET['id'])){
// Include and initialize database classinclude 'DB.class.php';$db = new DB;
// Get payment details
$conditions = array(
    'where' => array('id' => $_GET['id']),
    'return_type' => 'single');$paymentData = $db->getRows('payments', $conditions);

}?>

<?php// List all productsif(!empty($paymentData)){?>
    <h3>Your payment was successful.</h3>
    <p>TXN ID: <?php echo $paymentData['txn_id']; ?></p>
    <p>Paid Amount: <?php echo $paymentData['payment_gross'].' '.$paymentData['currency_code']; ?></p>
    <p>Payment Status: <?php echo $paymentData['payment_status']; ?></p>
    <p>Payment Date: <?php echo $paymentData['created']; ?></p>
<?php        }else{
    echo '<p>Payment was unsuccessful</p>';
}?>
<a href="index.php">Back to Home</a>
Make PayPal Express Checkout Live
When your test is completed on Sandbox environment and you’re satisfied with it, you can make the payment gateway live. Follow the below steps to configure PayPal Express Checkout payment gateway live for production.
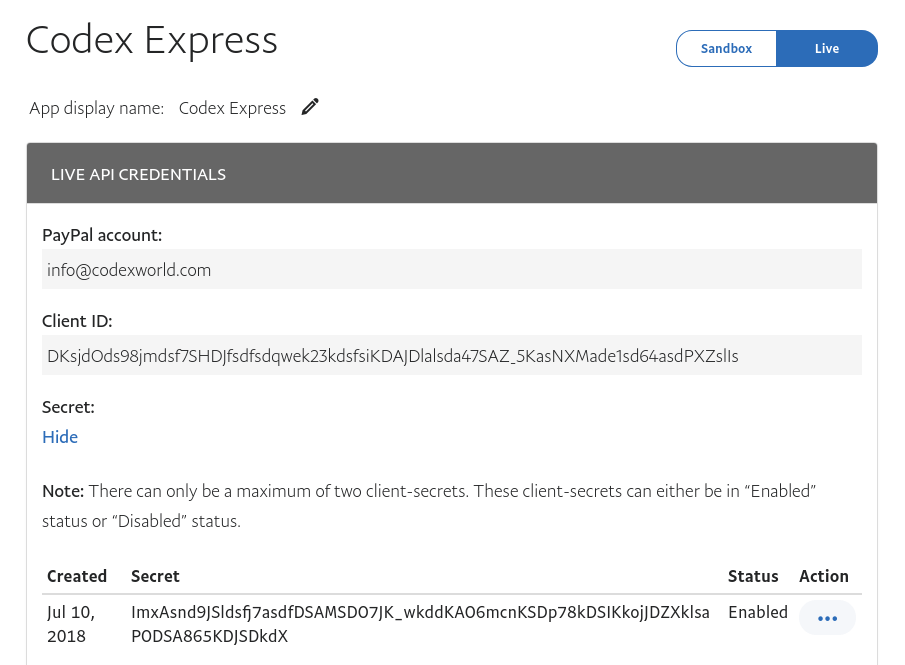
Get Live REST API credentials:
Go to the PayPal Developer Portal, log in to the Dashboard with your PayPal business account.
Go to the PayPal Developer Portal, log in to the Dashboard with your PayPal business account.
- In the My Apps & Credentials page, scroll down to REST API apps section.
- Click the name of the app that you created earlier.
- Select the Live tab and copy your live Client ID and Secret.

Specify Live API Credentials:
In PaypalExpress class (
In PaypalExpress class (
PaypalExpress.class.php), do the following changes.- $paypalEnv – Set environment to
production. - $paypalURL – Set API URL to
https://api.paypal.com/v1/. - $paypalClientID – Specify live REST API Client ID.
- $paypalSecret – Specify live REST API Secret.
public $paypalEnv       = 'production';
public $paypalURL       = 'https://api.paypal.com/v1/';
public $paypalClientID  = 'Your_Live_REST_API_Client_ID';
private $paypalSecret   = 'Your_Live_REST_API_Secret';
Conclusion
PayPal Express Checkout makes the online payment process simple and user-friendly. The buyer stays on your website throughout checkout flow and completes the payment process without leaving your website. Using the example code you can easily implement the PayPal express checkout process in your web application.
PayPal Express Checkout Integration in PHP
![PayPal Express Checkout Integration in PHP]() Reviewed by Pakainfo
on
July 17, 2018
Rating:
Reviewed by Pakainfo
on
July 17, 2018
Rating:

No comments: